Okay if you don't know what CSS resets are, I'll explain them in this paragraph, which you can skip if you do know what they are: You know how every browser under the sun has a somewhat different interpretation of how things should look? You say "make this thing go this far away from that thing" and some browsers go "ok I'll make the middle of the edge of this thing this far away from the middle of the edge of that thing" and another one goes "ok I'll make the outside of the edge this far away from the outside of the other edge" and so on. Maybe you do know, maybe you don't know, but if you're making layouts with HTML and CSS, you probably have noticed that. And you're either not required to be precise enough to have to care about it (that's awesome, you lucky, evil designer) or you do have to care (you poor, unfortunate soul). CSS resets tell every single browser to shut up about all those little variations, by neutralizing everything out, so that nothing looks like anything. Everything has no style. Which is great. It's not great if you want to not really do much in the way of CSS work, but if you want you CSS work to be what you think it's going to be, and be the same everywhere, and your boss/client/broke friend to be happy about their site, then it's wonderful. It's totally wonderful.
The old Eric Meyer reset was massively long. It was like... you'd have to explain it to your person who pays you, type long. The "minified" version, these days, is super short. Here it is:
/* Eric Meyer's Reset CSS v2.0 - http://cssreset.com */ html,body,div,span,applet,object,iframe,h1,h2,h3,h4,h5,h6,p,blockquote,pre,a,abbr,acronym,address,big,cite,code,del,dfn,em,img,ins,kbd,q,s,samp,small,strike,strong,sub,sup,tt,var,b,u,i,center,dl,dt,dd,ol,ul,li,fieldset,form,label,legend,table,caption,tbody,tfoot,thead,tr,th,td,article,aside,canvas,details,embed,figure,figcaption,footer,header,hgroup,menu,nav,output,ruby,section,summary,time,mark,audio,video{border:0;font-size:100%;font:inherit;vertical-align:baseline;margin:0;padding:0}article,aside,details,figcaption,figure,footer,header,hgroup,menu,nav,section{display:block}body{line-height:1}ol,ul{list-style:none}blockquote,q{quotes:none}blockquote:before,blockquote:after,q:before,q:after{content:none}table{border-collapse:collapse;border-spacing:0}
So what you do with this is, you put it at the beginning of your <style> tag. Or in your first imported/linked .css file. Or, hey, as a prank, put it right at the end, or in your last import. Great prank.
So obviously, nothing has style. So you have to write in every single aspect of style that you want for every single type of element. Don't muck about in Dreamweaver with it. Don't grab your silly list of what's what, just open up your Dom Inspector (sounds kinky, I know) that's built into your web browser. You can invoke it by right-clicking on something, or on a mac it's in some developer menu, maybe hitting "inspect element" will do it, they each have their own silly word for it. But in there, somewhere, probably on the right, you'll be able to find which HTML elements you want to mess with, and you'll be able to try adding different characteristics to their CSS, and then you just copy the code back into your authoring program. Then open it up in a different browser, and see whether that evil monster interpreted things in the same way. If you need two different versions of the same code, like you do for some esoteric, not-yet-integrated selectors or whatever they're called, then go ahead. Use two or three different repetitions of the same thing. Sure, we're all supposed to be using CSS frameworks now, so none of that is necessary, and our lives are rosy and perfect and of course nothing ever goes wrong with those frameworks, so knowing anything about actual CSS is perfectly useless and embarrassing. In the magical, mystical world of proposals, and inside the minds of creative directors. There are whole universes of beautiful impossibilities locked in there along with your imaginary day. In your actual day as a web designer, this is all a total lifesaver.
Love you, have a good one!
-Dorian
Showing posts with label dom inspector. Show all posts
Showing posts with label dom inspector. Show all posts
Mar 28, 2013
Google does the right thing about the Blogger Nav Bar
It's a time for rejoicing, not only in less sketchy CSS code needed but also in the reaffirmation of Google's intentions for us: it wants us to use its software, even if others don't know we're using it.
So now, let us bid farewell to all that is old and broken:


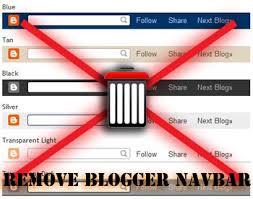

Now, we can chill out and work with this:

So now, let us bid farewell to all that is old and broken:
Now, we can chill out and work with this:


Jun 22, 2011
Wow! Firefox inspector hits and misses
I don't like FireBug. You know, the 3rd party utility that gives Firefox a DOM inspector that's somewhere between how bad IE 8's is, and how great the Chrome one is. It will let you edit CSS and HTML live, in the browser, and let you copy your changes so you can paste them back into your code. But it's like it doesn't really want to do those things for you. Chrome's inspector really does want you to do it. Taking my fiddling around into the inspector has cut my development time quite a bit, so I'm totally going to use whichever inspector makes it easiest.
I mean, thank goodness it's there so I can debug stuff in Firefox, but thank goodness Chrome's is better, so I don't have to do my CSS design with it. Whew.
This Firefox DOM inspector is even worse than FireBug, though. Try to select that CSS? No, don't try. Don't bother. Just use it to see why it looks like shit in Firefox, try your thing out, and then copy and paste the value. Don't try to copy and paste the whole declaration. Don't try to bring the value with it. Just write "font-size: ;" then hit the arrow-key back to the left of that semicolon, paste your thing, and thank your lucky stars you don't have to use Firebug every single time you're curious about some CSS.
I mean, thank goodness it's there so I can debug stuff in Firefox, but thank goodness Chrome's is better, so I don't have to do my CSS design with it. Whew.
This Firefox DOM inspector is even worse than FireBug, though. Try to select that CSS? No, don't try. Don't bother. Just use it to see why it looks like shit in Firefox, try your thing out, and then copy and paste the value. Don't try to copy and paste the whole declaration. Don't try to bring the value with it. Just write "font-size: ;" then hit the arrow-key back to the left of that semicolon, paste your thing, and thank your lucky stars you don't have to use Firebug every single time you're curious about some CSS.
Jul 14, 2010
Photo Gallery solutions that work with Blogger: SimpleViewer and Galleriffic
Blogger is great, but it's not easy to get a great photo album web gallery plugin that works with it.
I found two options, and explored them by implementing them on active projects. I'd like to provide stand-alone demonstrations to make sharing these solutions more convenient, but for now I've included links to the project pages. They can still be used to figure out how to implement on your own projects, and at least they're proof-of-concept prototypes.
I found two options, and explored them by implementing them on active projects. I'd like to provide stand-alone demonstrations to make sharing these solutions more convenient, but for now I've included links to the project pages. They can still be used to figure out how to implement on your own projects, and at least they're proof-of-concept prototypes.
Paul Van Roekel's Picasa Web Albums Simpleviewer Embed Code Generator
I demonstrated this with my roommate search page.
- takes about five minutes to set up
- takes the form of a flash viewer with acceptable performance
- the look and arrangement of elements is not editable
- pulls your gallery right from Picasa Web Albums, so you can edit
- it's not always best for commercial implementation
- the last slide in each gallery is an attribution slide mentioning Paul Van Roekel
- Simpleviewer branding appears when the plugin loads and in a little square to the bottom-right of the plugin, however the little square can be covered up by other HTML/CSS elements
- photos are inaccesible for download or viewing in another page, which could be a good or bad thing depending on whether your project favors accessibility or protection of the media
The Galleriffic JQuery Gallery Plugin
I demonstrated this with a client website.
- takes about an hour to properly adapt the plugin to our blog, if you've done it before
- the first time I implemented this, it took about eight hours to figure out the ins and outs of the plugin, and that's once I got it working outside Blogger, which was relatively easy
- uses CSS that needs to be modified to ensure that it doesn't conflict with Blogger CSS
- I haven't figured out a way to make it automatically grab gallery XML from Picasa Web Albums, so I've had to copy and paste photo URLs from there
- you can host (or pull) photos from wherever you want - Flickr, your own server, etc
- very customizable - all the effects, look and feel, etc are very flexible and can be easily edited with sensible CSS
- several "themes" are available from the authors to help make sense of the CSS and start from a point that's closest to your desired result
- as long as the CSS is modified judiciously, it performs well in all browsers across all systems, including when Javascript is unavailable, and it uses great HTML markup and CSS styling
- it's very ready for commercial deployment
- no branding or attribution is forced
- custom branding can be applied along with a custom look and feel
- photos can be sourced from the viewer, which makes them easy to share (or steal, if you're the type of person who thinks of it as theft)
Setting up a proper web development testing environment using VirtualBox and Windows on Linux or Mac
First off, it's best to be able to do your web development on a Mac because
- Coda, by Panic Software, is a great app and it's not for Windows or Linux
- It's harder (maybe impossible) to set up a Mac emulator on Windows or Linux than it is to emulate those operating systems on a Mac. So if you want it all, get a Mac. What I personally prefer is to have a physical computer for each of the main user groups in your target market.
I do my development on Ubuntu Linux, and have Macs around for testing. I need to be able to test with all the popular web browsers on Mac and Windows. That means:
- Chrome for Linux and Windows
- Safari for Mac and Windows
- Firefox for Linux, Mac and Windows
- Internet Explorer for Windows
So on my Linux computer, I use VirtualBox, a great free emulator from Sun Microsystems, and I have a Windows XP install that I use in a 1024 x 768 window. I have Chrome, Firefox, Internet Explorer, and Safari installed on it.
Because Chrome has the best DOM Inspector (the "Inspect this element" function in the right-click menu), and because Chrome uses the Webkit engine which also powers Safari, and because those are the two fastest-growing browsers in terms of active user base, I use Chrome as my main development and testing environment. Once I get something working in Chrome, I verify that it works in Firefox and Internet Explorer. I try to do this verification as frequently as is convenient, so that I don't end up having to backtrack and use Firebug in Firefox, which is kind of clunky, or Internet Explorer's absolutely hellish DOM inspector, to debug a webpage.
In Internet Explorer 8, you can use the Compatibility View and Developer Tools to inspect how a page would perform in earlier versions of the browser, but it's a good idea to have a Windows2000 install with IE6 as one of your VirtualBox machines, if IE6 compatibility is a requirement for your projects. As a side-note about IE6: I exercise due diligence in using industry-standard best-practices, which dictate that, at the very least, the site should work in all browsers, and look as good as it can in each, even if that means looking different in each. If a client demands that their site be identical in all browsers, and especially if there's anything even somewhat cool about the site, it can double or even triple the budget. Web Designers rarely present this information to potential clients, because we're embarrassed about how helpless we are to accomplish this task efficiently. We all blame the software.
Anyway, here's how to actually look at your files in emulated Windows without having to post them online:
In VirtualBox, you can set up shared folders to bridge the gap between your Windows browsers and your Linux or Mac filesystems. Your shared folders are accessed through your Windows network places, and function like mounted network folders. Sometimes I have to copy files over in order to get them to work properly, because of network permissions problems created by my Linux host. Host means the OS on which I'm running the emulator.
Setting up a Windows install in VirtualBox on a Mac is very similar to setting it up on Linux, and it's also an easy way to access Linux development tools on your Mac desktop.
Jun 23, 2010
Getting Blogger's clickTrap out of the way
Wow, if you add
div.blogger-clickTrap {display: none;}
to your custom CSS code in Blogger, you won't have to deal with getting rid of the ClickTrap (by unchecking its height property in the Inspector - in Chrome of course).
Subscribe to:
Posts (Atom)